Official guide · First connection

Shadowrocket Setup Guide

Import an existing subscription, choose Global Routing, and verify the connection. Follow five steps for an initial check before adjusting rule details.

Before you start: Install the app and have your own connection details

This guide assumes you have installed Shadowrocket from the App Store and already have your own subscription URL or server details. This site does not provide, sell, or recommend nodes or subscriptions. The app is a one-time purchase; a connection service is separate. Buying the app and obtaining connection details are two different things.

If you haven't installed it yet, first read How to verify and buy Shadowrocket on the App Store. System requirements for iPhone and iPad are listed on the App Store page. Interface terms are kept in English below; their exact placement may vary with the layout, so look for the matching labels.

  • Check your input details first
  • Then choose a traffic policy
  • Finally, verify real requests

01 / INPUT

Add a server or import a subscription

First identify what kind of information you have: individual server details, a server share link, or a subscription URL used to update a list of servers. These inputs are not interchangeable just because they look similar. A subscription is usually a URL that the client must fetch to get a list; server details describe a connection endpoint directly. Keep the original information intact. Don't remove URL parameters or enter a configuration file URL as a server address.

Add Server: Enter existing details manually

Open Home in Shadowrocket, find Add Server in the SERVER section, and open the add screen. Choose Type first, then fill in the fields for that protocol. The screenshot on the right shows a form with Host, Port, Password, and Method; other Types may require different fields. For example, with Shadowsocks, enter the existing address, port, password, and Method in the corresponding fields. For other protocols, follow the current form and your original details instead of copying the screenshot's field combination.

Enter the server address or domain in Host; don't paste a subscription URL with a full path into this field. Enter the port number in Port and check for spaces introduced when copying. Preserve passwords, identifiers, and encryption settings exactly, including capitalization. Save the entry, return to Home, and confirm it appears under SERVER. Seeing a name in the list only confirms that the details were saved, not that the server can connect.

Scan QR Code and Subscribe: Import the right type of content

If you have a QR code, use Scan QR Code in Add Server. Grant camera access if prompted and needed. After scanning, check the detected Type and server fields before saving. A QR code is just a way to carry information; it may not contain a single server, and its URL may no longer work. If the result looks wrong, check the original information instead of saving repeatedly and creating duplicates.

If you have a subscription URL, use the Subscribe entry for its content type. Subscribe in Config is for remote configuration subscriptions. For a server subscription that populates the SERVER list, import it by subscription type from the add-server entry. Don't treat the two as interchangeable just because both start with a URL. Paste the complete URL, including query parameters, remove leading or trailing spaces, and make sure you haven't copied any explanatory text. After importing, return to Home to check the server list; for an imported configuration, check in Config that the file was saved.

If the clipboard detects shared content, check its type before accepting the import. Import from Cloud JSON is for data in the corresponding format, not a general-purpose entry for any subscription URL. At this stage, keep only the specific entries you intend to test; don't change many servers or rules at once. For details on the different import options, see Four ways to import a subscription.
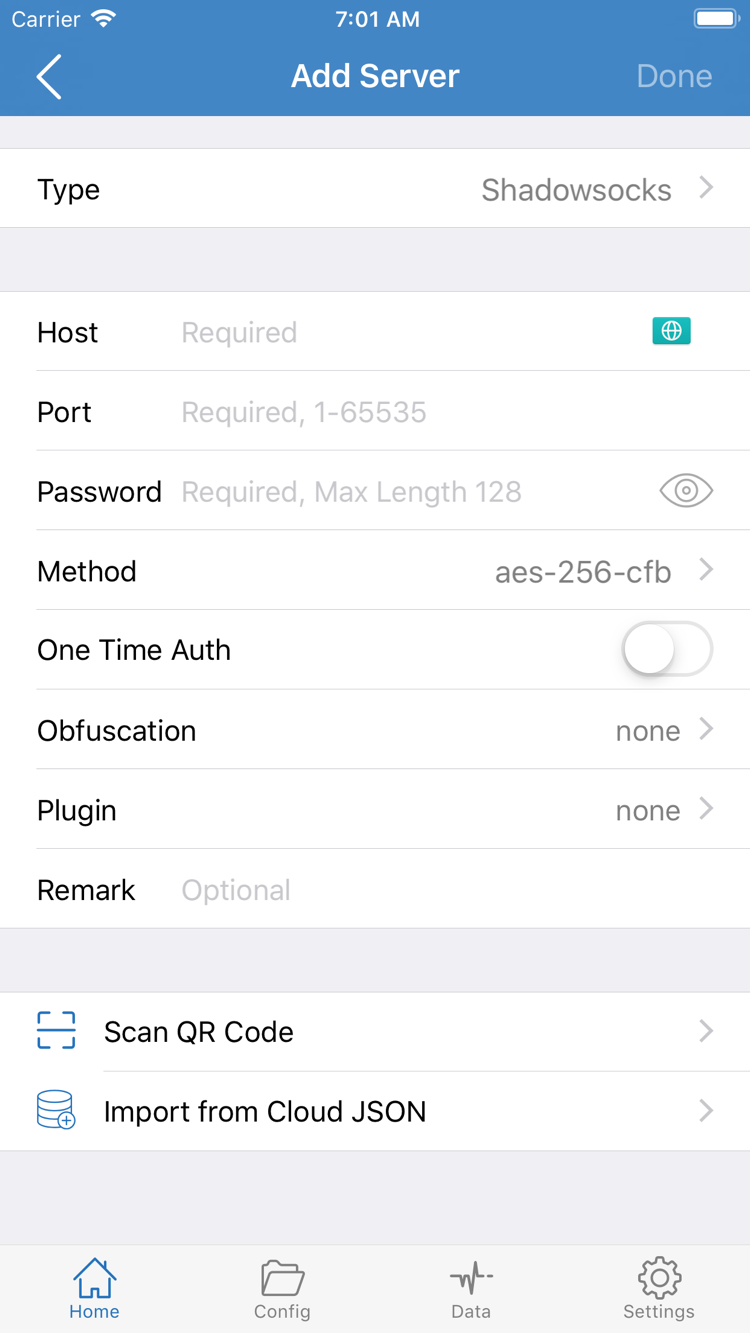
Shadowrocket's Add Server screen, showing Type, Host, Port, Password, and Method, along with Scan QR Code and Import from Cloud JSON
Add Server: Choose a Type first, then check its fields. The fields shown in the screenshot don't apply to every protocol.

02 / ROUTING

Choose Global Routing

After saving a server, don't jump straight into changing rules. First decide how traffic should be handled. Return to Home, open Global Routing, and check the current selection. The three options are Config, Proxy, and Direct. They determine how traffic is handled overall and are separate from the server selected under SERVER: the former determines how requests are routed, while the latter provides a connection endpoint.

Config: Apply the current rules

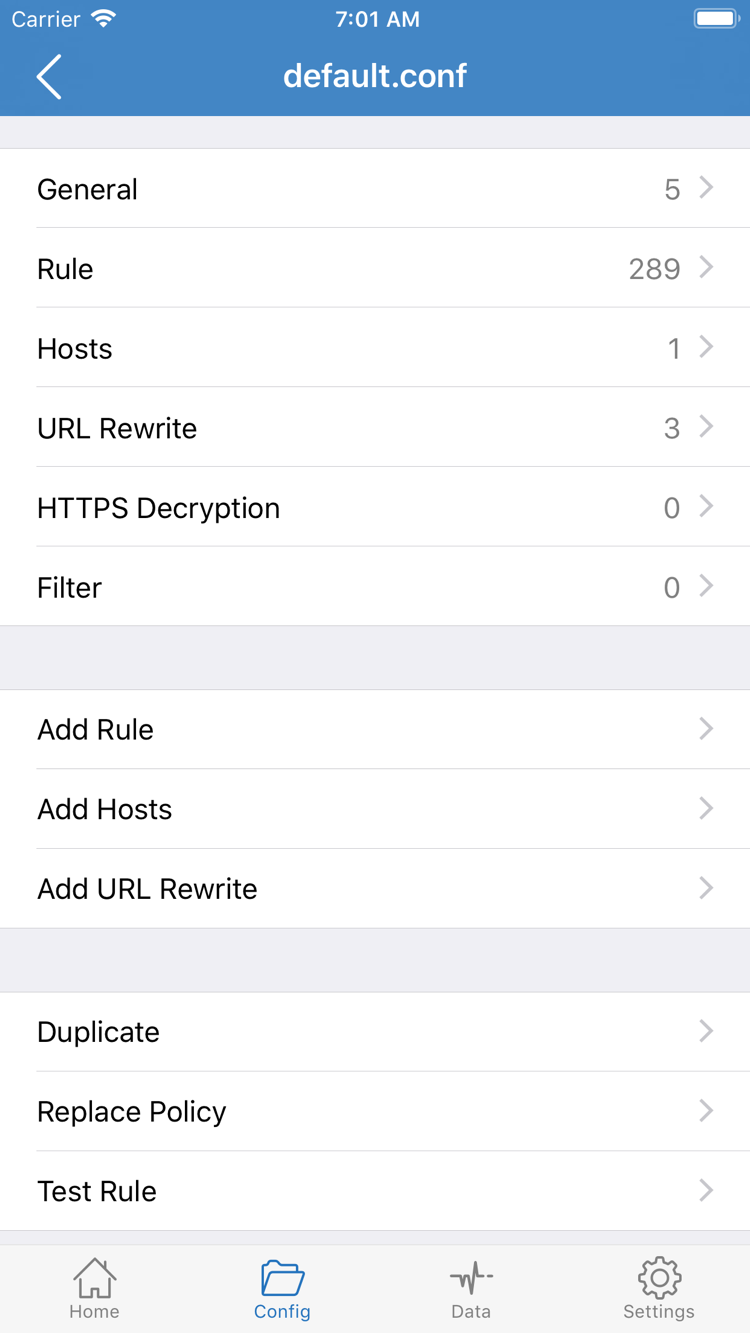
To route specific sites through a proxy while sending other requests directly, choose Config and confirm the active configuration file in Config. Open the file to see sections such as General, Rule, Hosts, and URL Rewrite. Check Rule first; don't enable features unrelated to your first connection. Rules are usually evaluated from top to bottom, and the first match determines the policy. The placement of rules for the same domain can therefore affect the result.

The example below illustrates rule structure; it isn't a complete configuration for every environment. example.com is a placeholder domain for learning purposes. Replace it with a destination you actually need to handle, and make sure PROXY refers to an available policy in your current configuration. The first line handles the domain and its subdomains; the last line sends unmatched requests to DIRECT. Back up your existing configuration before editing. When using Add Rule, check where the rule is inserted as well as how its keywords are spelled.

[Rule]
DOMAIN-SUFFIX,example.com,PROXY
FINAL,DIRECT

Proxy and Direct: Set an explicit traffic direction

Proxy sends applicable traffic through a proxy policy and can serve as a temporary comparison when checking whether the selected server can handle requests. Direct connects applicable traffic directly; it doesn't prove that the proxy is working. For a comparison, note the original selection, change only Global Routing, and visit the same destination. When you're done, restore the intended setting to avoid mistaking a forgotten mode change for a rule failure.

For your first setup, just distinguish the routing mode from the server; there's no need to write a complex configuration right away. If you already have a trusted configuration suited to your needs, use it and check that it's selected. To learn more about the behavior of DOMAIN, GEOIP, IP-CIDR, and FINAL, see the Routing Rules guide. By the end of this step, you should know which mode is selected and which file is active in Config.

Shadowrocket's Config editor, with General, Rule, Hosts, URL Rewrite, and HTTPS Decryption sections and an Add Rule entry
Config: View configuration file contents here; choose Global Routing from Home. For your first setup, focus on checking Rule.

03 / CONNECT

Select a server and authorize the connection

Once you've confirmed the mode, return to Home and select the server you want from the SERVER list. If the list came from a subscription, make sure you select an actual entry with complete connection details, not just a group heading. For the initial check, stick with one server. Switching entries repeatedly during connection makes it harder to tell whether the issue is with the server, rules, or current network.

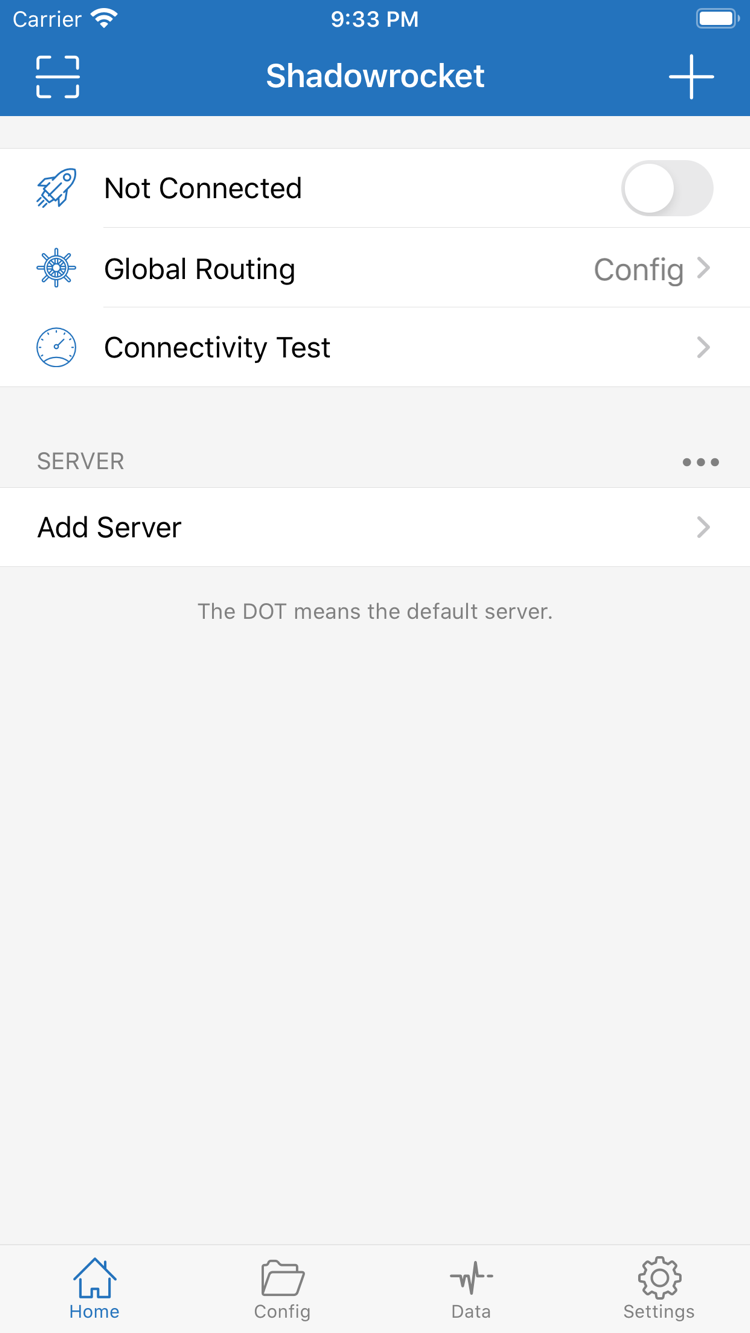
Confirm that Global Routing on Home matches your selection in the previous step, then use the connection switch at the top. Before connecting, you may see Not Connected; rely on the status shown on the current screen. On the first connection, the system asks to add a VPN configuration. This system authorization allows Shadowrocket to handle the device's network traffic; it's not a prompt to enter your subscription password. Check the app shown in the prompt, allow the configuration, and complete device authentication as required by the system.

If you previously denied authorization, try connecting again in the app and follow the system prompts to check the relevant VPN settings. Don't keep canceling the prompt and judge success only by the switch position. After authorization, return to Home and see whether the connection stays active. If it immediately returns to disconnected, stop here and troubleshoot before trying to fix it by adding rules. If the connection is established, continue to the next step and verify the traffic handling with real requests.

Keep two things distinct: when the system accepts the VPN configuration, it means the device allows the client to handle the relevant traffic. Whether the remote server can connect also depends on the address, port, credentials, protocol settings, and current network. Even if the switch stays on, direct requests may work while proxy requests fail. A VPN indicator in the system doesn't mean every destination is reachable as expected.

For your first setup, leave automatic connection conditions such as On Demand unchanged, and manually complete one connect-and-disconnect cycle. Avoid having another VPN configuration compete for the connection at the same time. To disconnect, return to Home, turn off the switch at the top, and confirm the status changes. This helps you identify which configuration is handling requests and gives you a clear baseline for comparison in the next step.

Step complete when

A server is selected in Home, Global Routing is set as intended, system authorization is complete, and the connection stays active. Now verify requests; an enabled switch alone isn't conclusive.

Shadowrocket's Home screen, with a Not Connected switch at the top, followed by Global Routing set to Config, Connectivity Test, the SERVER group, and Add Server
Home: Check the server, Global Routing, and connection status on one screen, then open Connectivity Test.

04 / CHECK

Verify with Connectivity Test

Once the connection stays active, run Connectivity Test from Home. Before testing, confirm that the same server is still selected and check Test Method in Settings; different methods measure different things. A result only shows that the specific test received a response under the conditions at that time. It doesn't prove that all sites, protocols, or rules are working. Likewise, a failed test doesn't mean every real request will fail.

Next, open a browser and visit one destination expected to use the proxy, then another expected to connect directly. Make a new request for each; don't rely on pages that were already open, as cached content can hide connection changes. With Config selected, check whether each request matches the expected rule and ends up with a PROXY or DIRECT policy. If you're temporarily using Proxy, first confirm that a request handled by the selected proxy policy completes.

Use these three items as a minimal verification record. Note only what you actually observed; there's no need to record full credentials or a long list of test numbers. The three checks complement one another, and none replaces the others.

Check Action What to confirm
Connection status Return to Home and check the switch and status The connection stays active after system authorization
Real request Visit a destination expected to use the proxy A new request completes, not just a cached page
Rule result Check the corresponding request log The matched rule and final policy are as expected

If a page opens but the policy is wrong, check Global Routing and Rule order first instead of immediately switching servers. For example, an earlier, broad rule may already match, so a later, more specific rule never determines the request. Conversely, if the policy is PROXY but the connection fails, check the server used by that policy and its protocol settings. Don't mistake a connection problem for a domain-rule problem.

When you're done, disconnect and reconnect, then repeat the check with the same destination to make sure the result wasn't caused by a stale connection. Recheck after changing networks, especially if the subscription or server details have changed. For more advanced checks of domain resolution, policy references, and rule priority, read the Rules and Configuration Reference. This getting-started guide focuses on establishing a repeatable verification path.

05 / REVIEW

Common issues and troubleshooting order

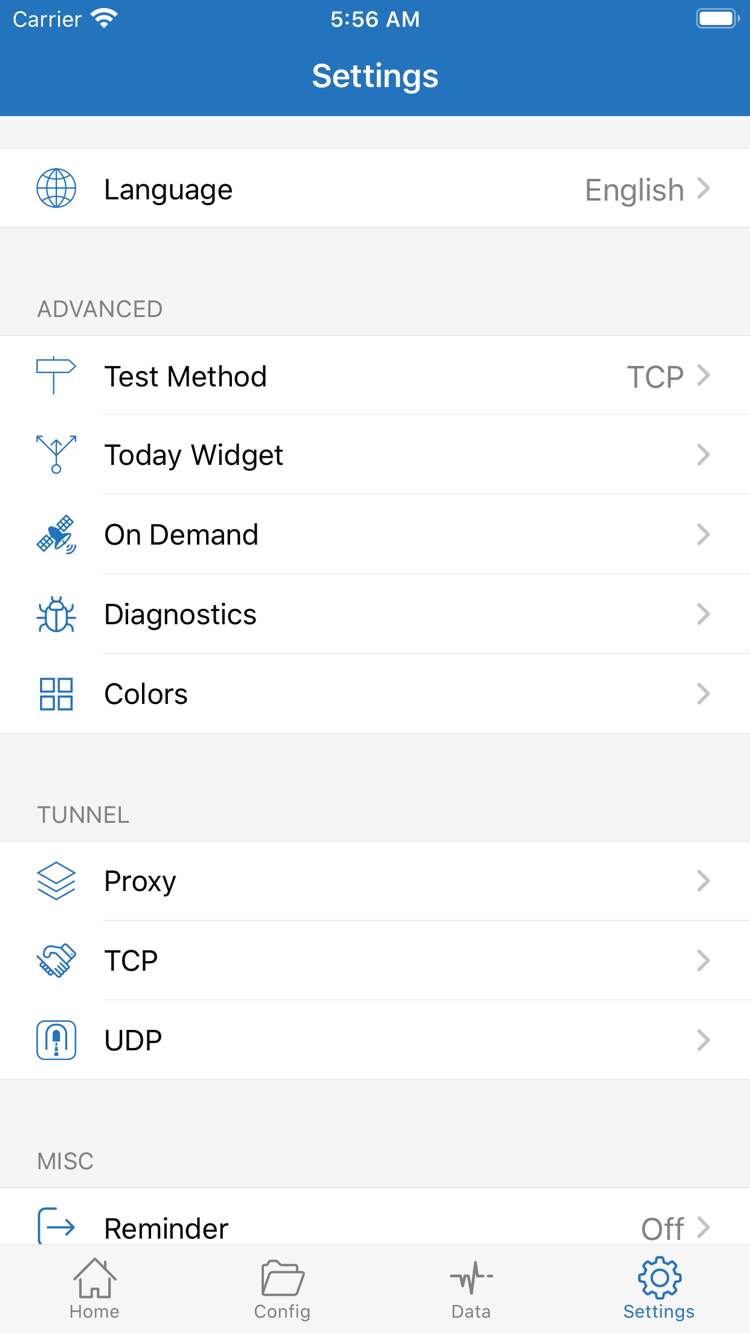
When something goes wrong, first identify whether the failure happened during import, connection setup, or an actual request. Open Settings to find Test Method, On Demand, Diagnostics, and related entries such as Proxy, TCP, and UDP. These settings serve different purposes; they aren't a set of “fix switches” to turn on all at once. Keep the original configuration, change one thing at a time, and retest the same destination before deciding whether to keep the change.

Subscription not working: Check the URL and response first

If an update fails or no servers appear after importing, check the original details to make sure the URL is complete and doesn't include line breaks, spaces, or chat text. Query parameters may identify the subscription; removing them can prevent the content from loading. Then check whether your current network can reach the subscription URL and whether the response is data the client supports, rather than a login page, error message, or webpage. Using the configuration-subscription entry instead of the server-subscription entry can also make it look as if the import succeeded while the list remains unchanged.

Don't repeatedly delete old entries that still work just to troubleshoot. Note the error first, then ask the provider of your existing connection details to confirm the URL status, content format, and usage requirements. Subscription URLs often contain personal access credentials; don't post them publicly or include the full URL in a troubleshooting screenshot. Once the import issue is resolved, return to step one and check the saved result instead of jumping straight to changing DNS.

Switch turns off or requests fail: Check the system and server separately

If the connection switch won't stay on, check that VPN authorization is complete, whether another VPN configuration is affecting the current connection, and any error message shown in the app. If the switch stays on but requests fail, check Host, Port, Type, and the corresponding credentials. Some protocols also require additional transport or TLS settings; these must match your existing details. A matching address and port alone don't prove the configuration is complete. Retry with the same server and network before changing both the network and settings.

If one domain fails while other destinations work, check its rule and resolution result. Don't mask the issue with an overly broad rule, and don't enable HTTPS Decryption without understanding why. Decrypting encrypted traffic is usually unnecessary for a first connection. Changing it by mistake adds new variables and makes a simple server connection issue harder to diagnose.

Test fails but browsing works: Check Test Method

Connectivity Test and browser visits may not use exactly the same request method. If browsing works but a test fails, check Test Method and the test conditions before deleting a server based on one result. If a webpage works but a certain type of app request fails, investigate TCP, UDP, domain resolution, and server capabilities separately. Success with one kind of request doesn't prove that all others are supported.

For further troubleshooting, use Diagnostics and remove sensitive information such as server addresses, subscription parameters, and account details before sharing. On Demand triggers connections based on conditions; it doesn't fix invalid credentials. First confirm that manual connection and verification work, then configure automatic behavior for your needs. For more information about the entries in Settings, see Features and Settings.

Save a working setup

Once import, connection, and verification all succeed, keep a backup of the current configuration and note the Global Routing mode and server in use. Use this reproducible setup as a baseline when changing rules later. For rule structure and backup tips, see the Routing Rules guide.

Shadowrocket's Settings screen, showing the Language, Test Method, Today Widget, On Demand, Diagnostics, Proxy, TCP, and UDP settings
Settings: Check Test Method, On Demand, or Diagnostics based on where the failure occurs. Change one setting at a time.